Painted American Vanity Finish Control sounds simple, but poor bathroom vanity paint can turn a hotel renovation into complaints, repairs, and painful replacement costs after only a short period.
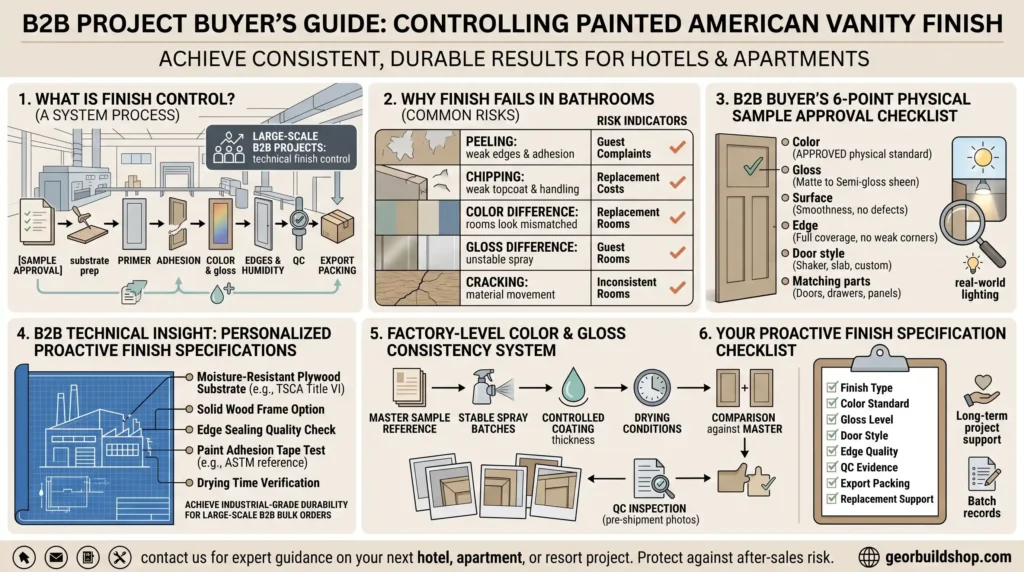
Painted American vanity finish control means managing sample approval, substrate preparation, primer, adhesion, color, gloss, edges, humidity resistance, QC, and export packing, so every vanity keeps a consistent and durable finish.
I have seen many beautiful samples fail when they became full project orders. A painted vanity in bathroom use must survive moisture, cleaning, handling, and daily guest contact. That is why I never treat painted finish as only a design choice.
Table of Contents
What Does Painted American Vanity Finish Control Mean?
Many buyers first look at painted vanity colors, but color is only the surface. The real problem starts when the approved sample cannot be repeated across many rooms.
Painted American vanity finish control means controlling the full finish process. I check sample approval, substrate preparation, primer, paint adhesion, color consistency, gloss control, edge protection, humidity resistance, QC inspection, and export packing.
It Is Not Only About Color
When I review a painted vanity order, I first explain that color is only the first step. A good finish also needs a stable base, clean sanding, correct primer, controlled spraying, full curing, and careful handling before packing.
Project Orders Need Stronger Control
A single vanity can have small differences, but a hotel or apartment project cannot accept visible color gaps between rooms. The finish must look consistent under different lighting, because guests and owners will notice uneven doors and panels.
The Goal Is Lower After-Sales Risk
Finish control should reduce color difference, peeling, chipping, rework, and replacement cost. I see this as a project risk control system, not only a factory production step.
A buyer should not judge a supplier only by one nice sample photo. I prefer to see the sample, the test method, the QC checklist, and the export packing plan together. This gives a clearer view of whether the finish can survive real project use.
Why Does Painted Vanity Finish Fail in Bathrooms?
A painted vanity in bathroom spaces faces water drops, steam, cleaning products, and hand contact every day. Weak coating systems often fail after installation, not during showroom display.
Painted vanity finish fails because moisture enters weak edges, paint adhesion is poor, spraying is unstable, or the material moves under bathroom conditions. These problems can cause peeling, cracking, chipping, color difference, and gloss difference.
Moisture Finds Weak Points
In my factory experience, moisture often enters from edges, corners, screw holes, and bottom areas. When these areas are not sealed well, the finish may lift, swell, or peel after repeated bathroom use.
Cleaning Products Add Pressure
Hotel cleaning teams often use stronger cleaners than home users. A finish that looks fine in a sample room may become dull, soft, or scratched when it faces daily cleaning and wiping.
Handling Damage Starts Early
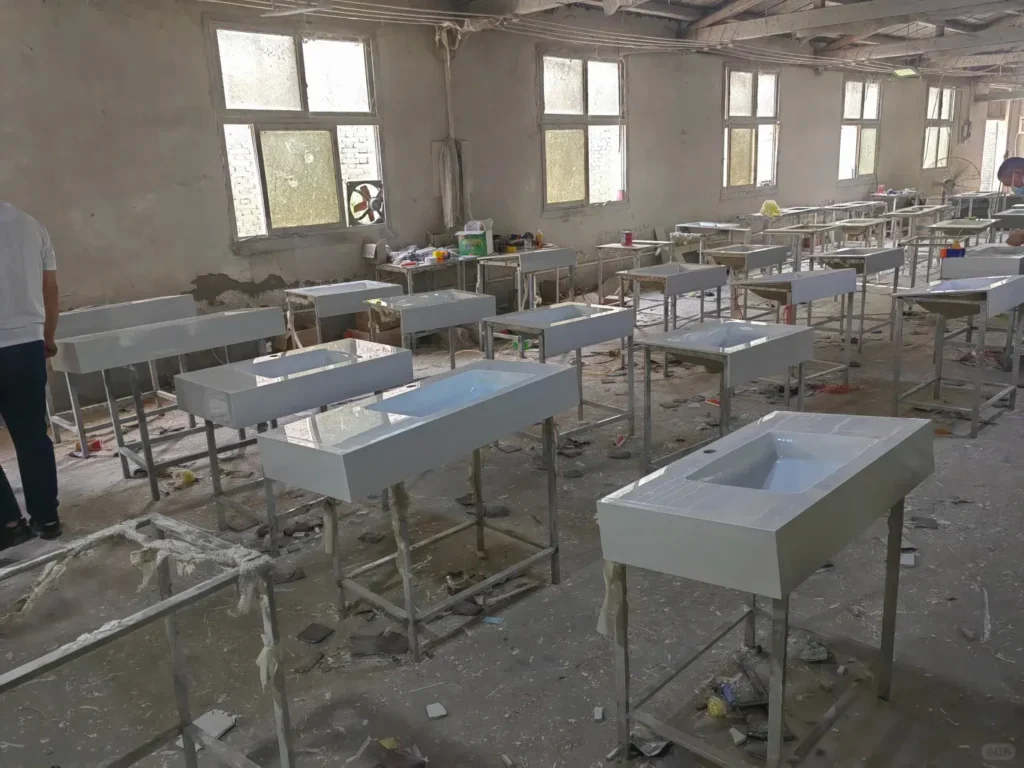
Some chipping happens before installation. It starts during stacking, moving, packing, loading, or site handling. That is why I always connect finish quality with packing quality.
| Common Problem | Possible Cause | Project Risk |
|---|---|---|
| Paint peeling | Poor adhesion or moisture entering edges | Guest complaints and replacement cost |
| Edge chipping | Sharp Shaker edges or weak topcoat | Visible damage after installation |
| Color difference | Different paint batches | Rooms look inconsistent |
| Gloss difference | Unstable spraying or drying process | Vanities look uneven |
| Cracking | Material movement or poor coating flexibility | Long-term maintenance issue |
Many buyers ask me about waterproof paint for bathroom cabinets. I always tell them that paint alone is not enough. The substrate, sealing, primer, topcoat, drying time, and edge protection must work together, or the best paint name will not save the project.
How Should Buyers Approve Painted Vanity Samples?
A computer image cannot show real gloss, texture, edge coverage, or color under hotel lighting. This is why I always ask project buyers to approve a physical sample before production.
Buyers should approve a physical sample board or sample door before mass production. They should confirm color, gloss, surface smoothness, edge quality, door style, and matching parts, not only a digital rendering.
| Sample Item | What to Confirm |
|---|---|
| Color | Match approved color code or physical sample |
| Gloss | Matte, satin, semi-gloss, or custom sheen |
| Surface | No orange peel, pinholes, dust, or rough sanding |
| Edge | Smooth coating, no weak corners |
| Door style | Shaker, slab, raised panel, or custom style |
| Matching parts | Doors, drawers, fillers, and side panels |
Approve a Real Sample
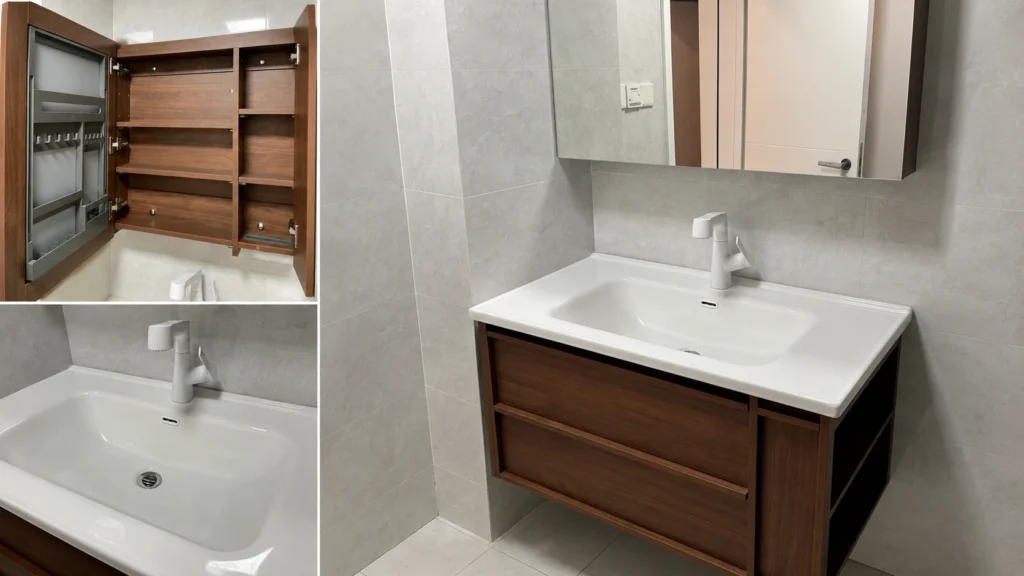
I prefer a sample door instead of only a small color chip. A door shows the real Shaker frame, corner, groove, sanding quality, spray coverage, and gloss reflection.
Check the Sample Under Real Light
A painted finish can look different under showroom light, hotel corridor light, and bathroom mirror light. I suggest checking the sample in several lighting conditions before final approval.
Keep the Master Sample
The approved master sample should be kept by the factory and buyer. During production, doors, drawers, fillers, and side panels can be compared against this standard.
I have seen projects where the buyer approved a color from a screen, then felt disappointed after delivery. This is avoidable. A real sample gives both sides a shared standard, so there is less argument after mass production starts.
How Can Factories Control Color and Gloss Consistency?
A beautiful painted vanity sample does not prove that 500 or 1000 units will look the same. The real test is repeat production with controlled color, gloss, and edges.
Factories control color and gloss consistency by using an approved master sample, keeping spray batches stable, controlling coating thickness and drying conditions, and comparing doors, drawers, side panels, and fillers before shipment.
| Control Area | Why It Matters |
|---|---|
| Color control | Prevents different rooms from looking mismatched |
| Gloss control | Keeps the finish visually consistent under hotel lighting |
| Edge control | Reduces chipping on Shaker frames, drawer fronts, and corners |
Use the Master Sample
I always want the factory team to compare production parts with the approved master sample. This reduces the risk of batch drift, especially for white, gray, navy, and other popular painted vanity colors.
Control Spraying and Drying
Spray thickness, spray angle, air flow, humidity, and drying time all affect the final appearance. Even the same bathroom vanity paint can look different when these production conditions are not stable.
Compare All Visible Parts
The door, drawer front, side panel, filler, and toe kick must be checked together. If only doors are checked, the installed vanity may still look uneven in the room.
This is where Painted American Vanity Finish Control becomes more than a nice phrase. It becomes a factory system. I like suppliers who can provide pre-shipment photos of color, gloss, surface, and Shaker edge details before loading.
How Does Paint Adhesion Affect Vanity Finish Durability?
A painted surface may look smooth on day one, but poor adhesion will show problems later. Peeling, bubbling, and edge failure often come from weak bonding under the coating.
Paint adhesion affects vanity finish durability because primer and topcoat must bond tightly to the substrate. Proper sanding, clean surfaces, suitable primer, correct drying time, and simple adhesion checks help reduce peeling and cracking risk.
| Adhesion Control | Project Meaning |
|---|---|
| Proper sanding | Helps primer bond to the substrate |
| Clean surface | Prevents dust, oil, and contamination under paint |
| Suitable primer | Reduces peeling and improves coverage |
| Correct drying time | Prevents soft coating and later cracking |
| Tape test reference | Helps buyers ask for simple adhesion evidence |
| Edge adhesion | Especially important for Shaker doors and drawers |
Sanding Must Be Controlled
I pay close attention to sanding because paint needs a clean and stable surface. If sanding is rough, uneven, or dusty, the coating may look acceptable first, but later defects can appear.
Primer Is Not Optional
A proper primer helps the paint cover better and bond better. It also helps reduce uneven absorption from the substrate, which is important for painted vanity colors and smooth final appearance.
Adhesion Evidence Helps Buyers
Some buyers mention ASTM D3359 because it is a known tape test reference for coating adhesion. I treat it as a useful discussion point, but I do not claim formal compliance unless the exact test is agreed and documented.
For wood or other non-metal vanity substrates, the test method and suitability should be discussed clearly. My practical advice is simple. Ask the supplier how they control adhesion, how they check edges, and what evidence they can share before shipment.
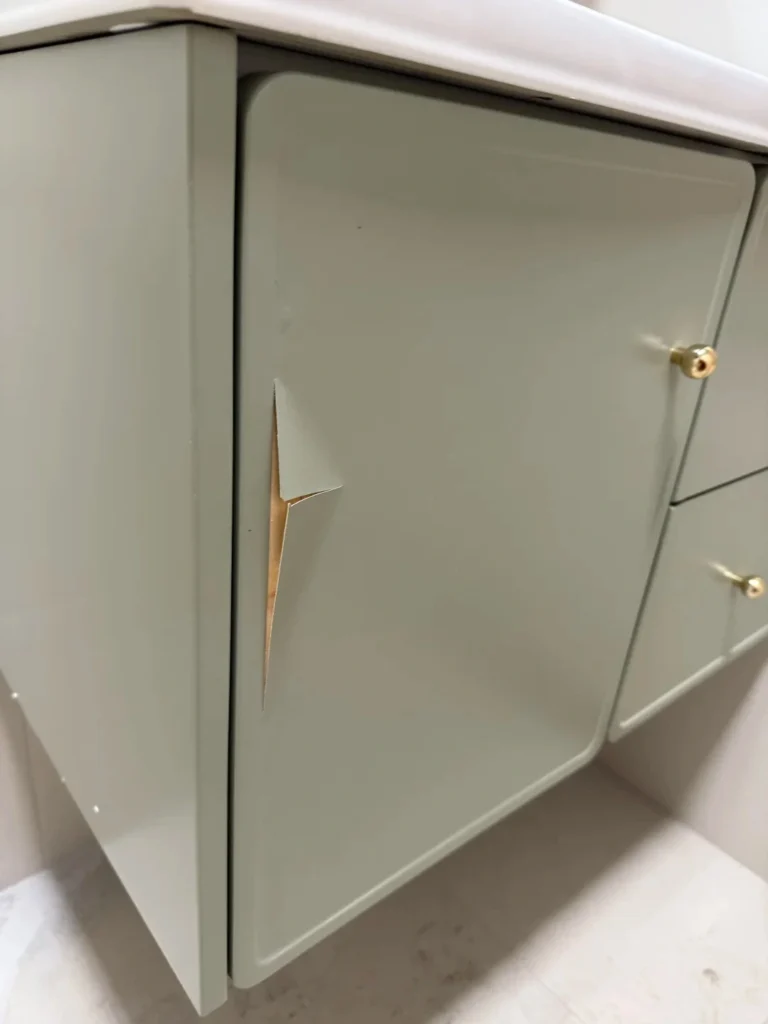
How Should Shaker Edges Be Protected From Chipping?
American Shaker vanity doors have frames, grooves, corners, and edges. These details create a classic look, but they also create more finish risk if the process is weak.
Shaker edges should be protected through slight edge easing, smooth sanding, full primer coverage, controlled spray angle, strong topcoat, careful drying, and export packing that protects corners and frequent touch areas.
| Edge Area | Risk | Control Method |
|---|---|---|
| Outer door edge | Easy to chip during handling | Slight easing, sanding, full primer coverage |
| Shaker inner frame | Paint may build up or crack | Controlled spray angle and drying |
| Drawer front edge | Frequent touch area | Strong topcoat and careful packing |
| Filler panels | Cut or adjusted on site | Provide touch-up guidance |
| Toe kick / bottom area | More moisture exposure | Better sealing and installation clearance |
Ease Sharp Edges
Very sharp edges may look clean, but they do not hold paint well. I prefer slightly eased edges because they allow primer and topcoat to cover more evenly and reduce chipping risk.
Protect Inner Shaker Frames
The inner Shaker frame area needs careful spray control. Too little paint creates weak coverage, but too much paint may build up in grooves and later crack.
Pack Corners Separately
Even a strong finish can chip if corners rub against cartons, hardware, or other panels. I always connect edge finish quality with corner protection, foam, spacing, and clear packing rules.
Shaker edge protection is one of the most important details for an American vanity project. A buyer may not notice weak edges during sample review, but installers and hotel guests will notice chips very quickly after delivery and use.
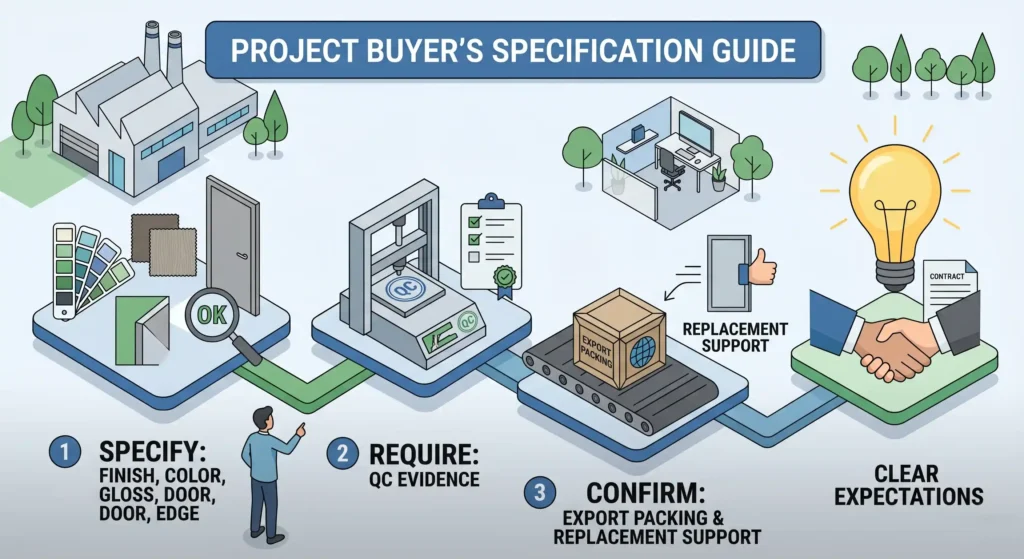
How Should Project Buyers Specify Painted Vanity Finish?
A vague request such as “white painted vanity” is not enough for a hotel or apartment order. A clear specification protects both the buyer and the supplier.
Project buyers should specify the finish type, color standard, gloss level, door style, edge quality, QC evidence, export packing, and replacement support before production. This makes expectations clear and reduces disputes.
| Specification Item | What to Define |
|---|---|
| Finish type | Factory-painted American vanity finish |
| Color | Approved physical sample or color code |
| Gloss | Matte, satin, semi-gloss, or custom sheen |
| Door style | Shaker, slab, raised panel, or custom design |
| Edge quality | Smooth coated edges with no exposed substrate |
| QC evidence | Inspection photos before shipment |
| Packing | Export packing with corner and surface protection |
| Replacement support | Batch records for future replacement parts |
Define the Finish Standard
I suggest writing the finish type clearly in the purchase file. The buyer should define whether the order needs matte, satin, semi-gloss, or a custom sheen based on the project design.
Ask for QC Photos
Before shipment, buyers should ask for photos of color comparison, gloss reflection, Shaker edges, drawer fronts, side panels, fillers, and packed goods. These photos help confirm the order before it leaves the factory.
Keep Batch Records
For hotels and apartments, replacement parts may be needed later. Batch records help the supplier match the original painted finish more closely when one room needs a new door or drawer.
Some buyers also search for painting bathroom vanity laminate or painting bathroom vanity before and after because they want to understand surface change. For project procurement, I focus more on factory-painted consistency, because site repainting is not a reliable way to control hundreds of bathrooms.
Case Study: Coastal Resort Renovation
Pain Point: A 200-room coastal resort faced severe edge chipping and finish swelling within 6 months due to high ocean humidity and poor factory edge sealing.
Solution: We engineered full-space bathroom supply, replacing them with our custom Shaker vanities using a 5-step edge sealing and strict primer-to-topcoat curing protocol.
Result: Flawless installation with 100% color consistency across all rooms, and zero moisture-related after-sales complaints over 3 years.
Conclusion
I believe a strong painted vanity finish comes from process control, not luck. At georgebuildshop, I share practical vanity knowledge to help project buyers choose better suppliers.
Streamline Your Hotel Supply Chain
As a leading One-Stop Bathroom Solution provider based in Foshan, Georgebuildshop handles more than just painted finishes. We integrate custom vanity design, wholesale showers, and full bathroom coordination to save you time and procurement costs.
Whether you are developing a boutique hotel or a large-scale resort, our expert team is ready to assist with technical specs and project pricing.
Please fill out the project inquiry form below to get a professional quote within 24 hours.